An area of every kitchen that may be forgotten is under the sink. Is this the yuckiest place in your kitchen? In your house? It was in mine. Other than The Boy's toilet. But that's a subject for another time.
In my current, full-time occupation of re-doing my kitchen, I had to deal with this yucky place. I had already removed everything from all my cabinets and drawers, sorted through it all, threw out or gave away stuff not needed, and put new shelf liner in all of them. But under the sink was different. It didn't need shelf liner. It needed a bomb.
I entered the darkness cautiously, slowly. Who knows what had taken up residence under there. I was afraid. Possibly more afraid than I had ever been. I used a broom to slowly pull each item out from across the room. Something could jump out and kill me, you know. As each piece appeared and I didn't die I grew braver. Soon I inched closer, and by the end of removing things, I was actually using my bare hands.
I know what you must think of me. I think that way about myself. Yes, I am awesome.
Anyway, after removing all the junk and sorting through it, I got to work scrubbing. I scrubbed and I scrubbed. I scrubbed until my fingers were just bloody nubs. It looked considerably better, but I wasn't ready to put stuff back inside. I raced to the bathroom. I reached into the darkness under that sink and pulled out some leftover peel and stick floor tiles. They would make cleaning under the sink a joy. I would be able to look under there whenever I was having a bad day and be instantly cheered up. Clouds would part, angels would sing.

I ran back to the kitchen with my idea and my tiles. I started at one side and in the front so any cuts would be in the back. If you do this, make sure you check the back of each tile. They have arrows if there is any pattern to follow and you want to pay attention to that.
I stuck the first couple down quickly since they were full pieces. Then I had to measure and cut. A couple of tips here. Use a whiteboard marker to make your marks on the front of the tile. It's better to cut from the front rather than the back and the marker will wipe right off when you finish cutting. Next tip is to make sure you have something under your tile when you cut. Yes, that is common sense, but I'm sure I'd get a message that someone cut through to their brand new kitchen counter and destroyed it and it was all my fault they didn't use common sense.

Make your cut, using a ruler. It doesn't have to go all the way through. Then, carefully bend it back along that cut. It will finish cutting through to the paper backing. Now, turn it around to the back and slide your knife down the cut to finish cutting the paper.


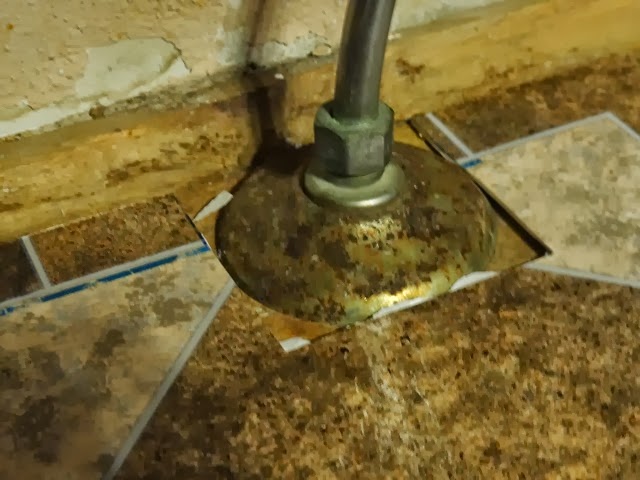
This all goes pretty quickly as long as your cuts are simple, straight lines all the way across a side. But you will come to the pipes under there sooner or later. When you see that time approaching, dust off your cuss words. You may need them.

I'd like to give you instructions on how to best do this part, but it's a matter of holding your tile up there, making lines, cutting them out, cussing because you did it wrong, and starting over. I'll do my best. First, cut your length to the back. Now you need to hold your tile, face side up, and make marks on your tile to correspond to either side of each pipe. Then move your tile to the side of the pipe and make cross marks to show how far back to cut. Understand? Here's a pretty picture.

Carefully cut out your spaces. Now do a dry fit. Cuss again, Start over. You probably will get it someday. Each time you make a mistake you'll see what you did wrong and try to correct it the next time. I chose square cuts to go around and tube shape. If you really like cussing, go ahead and cut it out in a circle. I figured I would never see it once everything was put back inside, so I opted for the easier solution. This may be a good time to bring up centering your tiles in the space. If you want it to look professional, you know cuz professionals use peel and stick tiles, you'll want to find your front center point and lay the tiles out beginning on that line. I didn't care, because once again, I'll never see it after everything is back in and the doors are closed.


And there you have it. Easier to clean and all pretty-like. Now put your stuff back away neatly. Stand back and admire the beauty. The neatness. The organization. Say good-bye and close the doors. It will never look like this again.

I used a piece of rubber backed (washable) rug under the sink. Much easier to hide the mistakes, LOL! I did use leftover linoleum scraps to line my drawers though. Sure is nicer than shelf liner.
ReplyDeleteI'll bet it adds a little strength to the drawers, too. The nice thing about under my sink is that the cabinets were custom made almost 50 years ago and so everything is solid wood. We've had some pretty flimsy sink cabinets in the past that would have benefited from some added strength and thickness.
Delete